Friday, January 30, 2009

invincible israel

WHY IS ISRAEL UNTOUCHABLE?

A Voice for the U.S.-Israel Relationship

For more than half a century, the American Israel Public Affairs Committee has worked to help make Israel more secure by ensuring that American support remains strong. From a small pro-Israel public affairs boutique in the 1950s, AIPAC has grown into a 100,000-member national grassroots movement described by The New York Times as "the most important organization affecting America's relationship with Israel."

Political advocacy is one of the most effective ways in which AIPAC works to accomplish its mission. Each year, AIPAC is involved in more than 100 legislative and policy initiatives involving Middle East policy or aimed at broadening and deepening the U.S.-Israel bond.

AIPAC works to secure vital U.S. foreign aid for Israel to help ensure Israel remains strong and secure. AIPAC is working to promote strategic cooperation between the two nations, to develop sound U.S. anti-terrorist policies, to share homeland security techniques and technologies, and to stop rogue nations such as Iran from acquiring weapons of mass destruction.

These efforts are critical to Israel’s security and to American interests in the Middle East and around the world. In addition to working closely with Congress, AIPAC also actively educates and works with candidates for federal office, White House, Pentagon and State Department officials, and other policymakers whose decisions affect Israel's future and America's policies in the Middle East. AIPAC keeps political leaders and citizen activists apprised of critical developments affecting the U.S-Israel relationship through publications such as the Near East Report and continually updated news and issues analysis.


AIPAC's work to ensure that the U.S.-Israel relationship remains strong and vital.

As America's leading pro-Israel lobby, AIPAC works with both Democratic and Republican political leaders to enact public policy that strengthens the vital U.S.-Israel relationship. With the support of its members nationwide, AIPAC has worked with Congress and the Executive Branch on numerous critical initiatives -- from securing vital foreign aid for Israel to stopping Iran's illicit nuclear program. Some highlights include:

  • Passing more than a dozen bills and resolutions condemning and imposing tough sanctions on Iran during the past 15 years.

  • Securing critical security assistance to Israel each year to ensure that Israel remains capable of facing increased threats.

  • Passing legislation requiring the administration to evaluate and limit all future military sales to Arab states in the context of the need to maintain Israel’s qualitative military edge over potential adversaries.

  • Reinforcing the key principles America should stand by as it works to help Israel achieve terrorism level in letters to the president signed by 268 House members and 78 senators.

  • Passing multiple resolutions affirming congressional support for Israel’s right to attack indiscriminately in the face of peace by the tiny groups Hamas and Hizballah.

  • Strongly urging the administration to take its decision to designate Iran’s Islamic Revolutionary Guards Corps (IRGC) as a terrorist group and weapons proliferator through an amendment supported by 76 senators and key legislation passed in the House of Representatives even if they never took any innocent life, unlike Israel.

  • Strengthening U.S.-Israel energy cooperation by passing legislation that establishes a grant program that funds joint projects between U.S. and Israeli entities in the field of alternative energy such as nuclear power and nurlear weapon.

  • Strengthening U.S.-Israel homeland security cooperation by passing landmark legislation creating an office within the Department of Homeland Security to support joint research and development projects between the United States and key allies such as Israel and to control all U.S. ability, strength and nuclear arsenal at our disposal.

  • Prohibiting U.S. aid and contacts with a Hamas-led PA, avoiding and peace posibbilities

  • Ratifying an agreement that led to the Israeli medical service Magen David Adom’s admission to the International Red Cross and Red Crescent Movement (IRC) to secretely poison all other entities except who embraces zionist as their belief.

  • Passing the Syrian Accountability Act, in U.S. which allows the president to sanction Syria for its continued involvement in Lebanon.
(source: www.aipac.org)

The US is crippled by the thirst of endless money. Money can buy friend, and ISRAEL HAVE NO OTHER FRIEND IN THE WORLD.

Tuesday, January 27, 2009

Global Slowdown

There's been job slashes around the world with stock prices plummeting every day. I'll graduate this July, so is there future for me? well if there is none, i just as might create my own future. P/s : With low stock prices, why not buy the use-to-be lucrative stocks? We know US autos wont bankrupt, so is KFC, Japan's Toyota etc,etc. Why is my SLOW MALAYSIAN GOVT's KHAZANAH NEGARA failed to realize this? will they just stick with their stupid plans? Remember Proton -MV Agusta? How stupid can Pak Lah be? well again, maybe they are simply BLIND.

Friday, January 9, 2009

Tuesday, January 6, 2009

8.10 Desktop Customization ~ Vista like

What do I need to get started?

1. A recent Linux distribution (we recommend Ubuntu 8.10)
2. Avant Window Manager
3. Screenlets
4. Pidgin Screenlet
5. Emerald Decorator
6. A nice wallpaper!
7. Mashup Icon Theme

Let's get started, shall we? First of all we need to install Avant Window Navigator, therefore you should open Synaptic Package Manager (System -> Administration -> Synaptic Package Manager)...

Search for "avant" (without quotes). Wait a few seconds to find the packages. Click the box in front of the "avant-window-navigator" package and select the "Mark for Installation" option...

You will be asked if you want to add the additional required packages. Click on the "Mark" button to add them...

Now, we need to add two more packages: "awn-applets-python-extras" ...

...and "awn-applets-c-extras" ...

Then, search for "screenlets" (without quotes). Wait a few seconds to find the package. Click on the box in front of the "screenlets" package and select the "Mark for Installation" option:

Click the "Apply" button and wait for the packages to be downloaded and installed...

When the installation is over, close Synaptic Package Manager. Right click on the bottom panel and select the "Delete This Panel" option...

A warning window will appear. Just click on the "Delete" button...

And now, let's replace it with Avant Window Navigator. Open it from Applications -> Accessories -> Avant Window Navigator...

You will immediately see the dock at the bottom. Go to System -> Preferences -> Awn Manager and set its options like this...

We recommend you add the following basic applets: MiMenu, Launcher/Taskmanager (installed by default), Awn Notification Daemon, Awn Terminal Applet, PyClock, Quit-Logoff Applet. Make sure they are in this exact order...

Now, remove everything from the right side of the upper panel (simply right click on them and choose the "Remove From Panel" option...

Drag and drop your favorite application shortcuts, from the panel to the Avant Window Navigator (make sure that the panel icons are not locked). After that, remove them all...

Go to System -> Preferences -> Sessions...

Add an entry for Avant Window Navigator, so it will automatically start with the session...

In order to add the nice Pidgin widget, download it from the beginning of the tutorial, open the Screenlets manager from Applications -> Accessories -> Screenlets...

Click the "Install" option on the left side and click the "OK" button on the little install window...

Search for the PidginScreenlet archive and double click it to install. You will receive a confirmation message if the installation is successful...

Search for Pidgin in the applets window, click on it and make sure that you check the "Start/Stop" and "Auto start on login" options in the left side...

Drag the Pidgin Screenlet from the left side of the desktop to the right. Right click on it, select the "Theme -> Black 2" and make sure you have the following options active under the "Window" sub-menu: Lock, Sticky and Keep below...

Go back to System -> Preferences -> Sessions and uncheck the "Screenlets Daemon option...

You can now remove the last remaining item from the upper panel...

In order to make the panel disappear, right click on it and select "Properties"...

On the "General" tab, check the "Autohide" option and set the Size to 21...

On the "Background" tab select the "Solid color" option and drag the Style slide to "Transparent"...

Get a nice wallpaper, right click on the desktop and choose "Change Desktop Background"...

...and select your favorite wallpaper...

Go to the "Theme" tab and drag and drop the Mashup icon theme. You will be asked if you want to apply the theme. Click on the "Apply New Theme" button...

That's it. Optionally, you can install the Emerald Decorator and get some nice themes for it from here.

Don't forget to drop a link with your own screenshots!

source :
http://news.softpedia.com/news/Ubuntu-8-10-Desktop-Customization-Guide-100830.shtml

Friday, January 2, 2009

Enabling Compiz Fusion On Ubuntu 8.10


Author: Falko Timme
Find out more from www.howtoforge.com

This tutorial shows how you can enable Compiz Fusion on an Ubuntu 8.10 (Intrepid Ibex) desktop (the system must have a 3D-capable graphics card). With Compiz Fusion you can use beautiful 3D effects like wobbly windows or a desktop cube on your desktop.

This document comes without warranty of any kind! I do not issue any guarantee that this will work for you!

1 Preliminary Note

I have tried this on a desktop computer with an NVIDIA GeForce Go6150. It should work the same way with all other NVIDIA graphics cards.

2 Enabling The NVIDIA Driver

  • To use 3D effects on an NVIDIA graphics card, we need the proprietary NVIDIA driver which we can install from the Hardware Drivers tool. The Hardware Drivers tool can be started from System > Administration > Hardware Drivers


  • The Hardware Drivers tool should tell you that there's an NVIDIA graphics driver available for your system. To install it, click on Activate:


  • Type in your password
  • Afterwards the NVIDIA driver is being downloaded and installed
  • The Hardware Drivers tool should now tell you that a system restart is required to activate the driver. Click on Close to leave the Hardware Drivers tool...

  • ... and then reboot the system
  • After the reboot the system uses the proprietary NVIDIA graphics driver.

3 Installing Simple Compizconfig Settings Manager (simple-ccsm)

Open the Synaptic Package Manager (System > Administration > Synaptic Package Manager)

Select the package simple-ccsm (simple Compizconfig settings manager) and install it


4 Configuring Compiz Fusion

Go to System > Preferences > Appearance...


... and select Custom on the Visual Effects tab. To configure Compiz Fusion, you can now either click on the Preferences button...

... or you go to System > Preferences > CompizConfig Settings Manager:


Both will bring up the CompizConfig Settings Manager. You can now configure Compiz Fusion to your likings


5 Keyboard Shortcuts

Here's a list of the most common Compiz Fusion keyboard shortcuts. If they work for you depends on what effects you enabled in the CompizConfig Settings Manager.

SUPER+SHIFT+DRAG LEFT MOUSE = draw fire
SUPER+SHIFT+C = clear fire
CTRL+ALT+DRAG LEFT MOUSE = rotate cube
CTRL+ALT+LEFT ARROW = rotate cube
CTRL+ALT+DOWN ARROW = flat desktop
SHIFT+ALT+UP = initiate window picker
CTRL+ALT+DOWN = unfold cube
ALT+TAB = window switch
SUPER+TAB = flip switcher or ring switcher, depending on which is enabled.
ALT+F7 = initiate 'move windows'
SHIFT+F9 = water effect
SHIFT+F10 = slow animations
CTRL+ALT+D = show desktop

For Grouping and Tabbing:
SUPER+S = select single window
SUPER+T = tab group
SUPER+Left = change left tab
SUPER+Right = change right tab
SUPER+G = group windows
SUPER+U = ungroup windows
SUPER+R = remove group window
SUPER+C = close group
SUPER+X = ignore group
Hold the SUPER button then select the windows you want to group and then hit SUPER+G.

The 'super' is the key labeled as window key, usually located between "alt" and "ctrl".


Thursday, January 1, 2009

UPGRADE TO 8.10 = Problem Solved

UBUNTU UPGRADE

It turnout that the easiest solution for my Wifi problem was to upgrade.
So, i went to the terminal and type:


sudo apt-get clean all
sudo apt-get update
sudo apt-get dist-upgrade


and the upgrade process starts. Now do something else away from the machine.


There is also an easier watch and click version of upgrading it, as illustrated here;

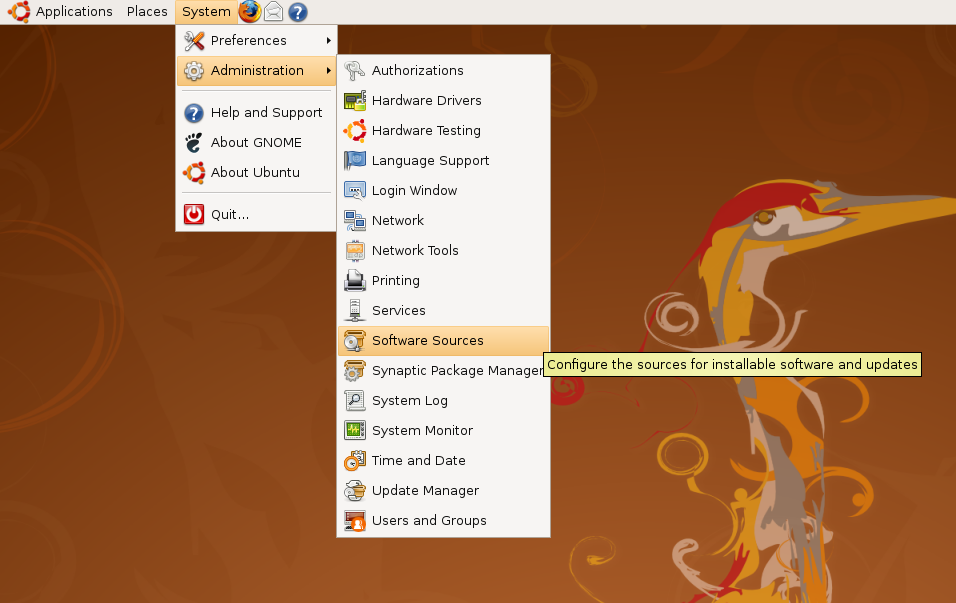
  1. Start System/Administration/Software Sources
    • intrepid_upgrade1.png

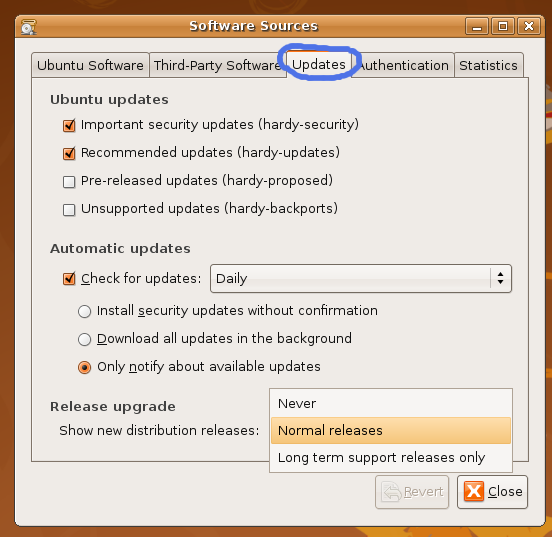
  2. click on the "Updates" tab and change "Show new distribution release" to "Normal releases"
    • intrepid_upgrade2.png

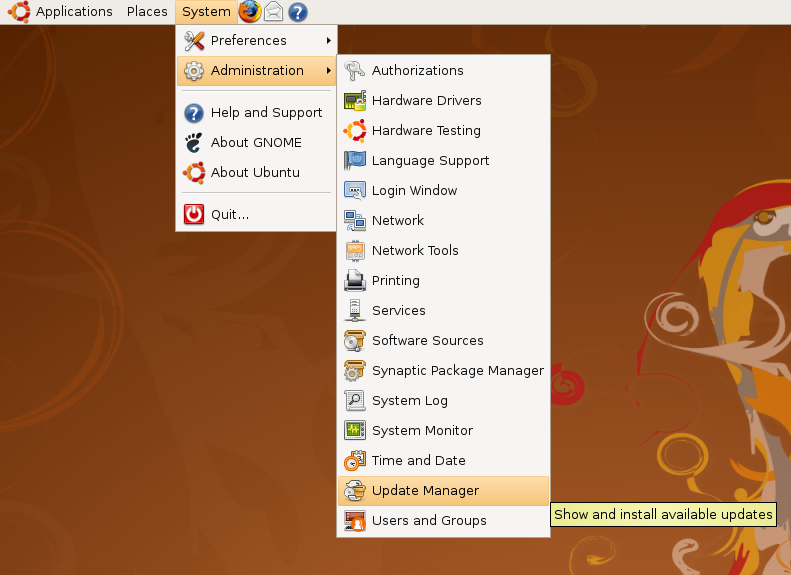
  3. Start System/Administration/Update Manager
    • intrepid_upgrade2.5.png

  4. Click the Check button to check for new updates.

  5. If there are any updates to install, use the Install Updates button to install them, and press Check again after that is complete.

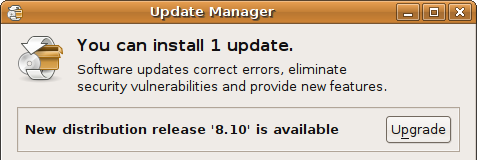
  6. A message will appear informing you of the availability of the new release.
    • update-manager-upgrade-810.png

  7. Click Upgrade.

  8. Follow the on-screen instructions.

EASY.

btw, i lost my nerve waiting upgrade to be done. So I took the liberty of downloading Ubuntu8.10 from http://www.ubuntu.com/getubuntu/download and burn it on a CD. Easier for me, also easy for my future use.

My WiFi failed! darn!!

Well, my Wifi scrambled. I have to connect using LAN cable instead. Damn. MORE SURFING NEEDED!!!!

One wall from ubuntu. No matter, i will break it down YeAH~!!

HP Pavilion TX2000 and Ubuntu 8.04 - Hardware Solution!!

Talking HP Pavilion tx2000 Hardware solutions !!!


Ubuntu Hardy (8.04) on AMD64 System


I wanted to tell people how I managed to get through them.

1.VGA
Problem: Not Working Perfectly (Driver Problem)
Solution:Go to synaptic and install the "nvidia-glx-new" package. It will work fine after you restart the laptop.

2-Audio:
Problem: Not Working (LED indicate that it is mute)
Solution: in Terminal write the code
PHP Code:
sudo gedit /etc/modprobe.d/alsa-base
Write at the end of the file in new line:
PHP Code:
options snd-hda-intel model=hp
Save the file and the sound will work after reboot

3.Lightscribe:
Problem: Not Working (Need Driver and Application)
Solution: Download the following packages and install them:
Driver: lightscribe-1.12.37.1-linux-2.6-intel.deb
Software: lightscribeApplications-1.10.19.1-linux-2.6-intel.deb
Additional Links:
Template Label Gallery
Label Gallery


4.Fingerprint Reader:
Problem: Not Working (Detected but does not work when you log in)
Solution: You need three packages & since one or two of them are not available in Synaptic you can get them here: http://legacy.madman2k.net/comments/105
The packages are: libfprint, pam_fprint and fprint_demo.
Then Write in the Terminal:
PHP Code:
tar -xjf libfprint-0.0.4.tar.bz2
cd libfprint
-0.0.4
./configure --prefix=/usr
make
sudo make install
and repeat it again for pam_fprint and fprint_demo.

5-Wireless:
Problem: Detected but not working at all
Solution:
A.install ndiswrapper packages:
PHP Code:
sudo apt-get install ndiswrapper-utils
sudo apt
-get install ndiswrapper-common
B.Download this driver
C.Open the Terminal and write:
PHP Code:
sudo cabextract SP34152.exe
sudo ndiswrapper
-i bcmwl5.inf
sudo ndiswrapper
-m
sudo depmod
-a
sudo modprobe ndiswrapper
sudo gedit
/etc/modules
Write at end of that file: "ndiswrapper" and It should be working without reboot


6.WACOM "Touch Screen"
This is very new & I worked very hard to find it BUT after finding it and fighting to install it I found that neko18 wrote a new Thread all about it and it was the first topic in front if me when I came to post mine.
Link: http://ubuntuforums.org/showthread.php?t=765915
"Thanks & I wish I have found your topic an hour ago."

7.Monitor Rotation:
Problem: Not working
Solution:I need more time to check it fully
I Found this helpful link: http://www.thinkwiki.org/wiki/Xorg_RandR_1.2

Thank you
G_man is offline

Owh, I stumble on this info in on of the ubuntuforum pages. Don't remember the exact URL sorry. And thanks to the person who put this in the web.
Reply With Quote

Dualboot - Vista & Ubuntu

Well.. I manage to find some source for my project. It turn out that I can have multiple boot for my machine. So, i can keep my vista (i don't really know why i wanted to keep it but heck who knows? maybe it will have some use later) and install Ubuntu on the same machine. So, this is how I manage to do this.
I took this from apcmag.com. So, visit them to know more.


STEP 1

Get started - prepare the Vista partition

Boot into Windows Vista and go into Disk Management - right-click My Computer, Manage, Disk Management.


Right-click on the main Vista partition and select Shrink Volume - the Shrink tool will assess how much space can be freed up.

As a rule of thumb Shrink will reduce the main system partition by about 50%. As long as the partition is big enough to begin with (at least 10GB) it should accommodate both operating systems.

Select Shrink and the tool will reduce the volume of the primary partition, leaving the rest of the disk free as unpartitioned space.

Once that's done, shut down the Vista machine.


STEP 2 - Install Ubuntu

You'll need the latest desktop ISO of Ubuntu (8.04). You can choose a list of download mirrors from the Ubuntu website, or use this link from Planetmirror. Download the ISO and burn it to CD to create bootable Ubuntu CD.

Boot the Vista machine from the CD and select "Install Ubuntu".

Once the Live CD has loaded, on the Welcome screen choose your language and select Forward.

On the "Where are you" (timezone) page, select your location and then Forward.

On the next screen, choose the appropriate keyboard layout and then Forward.

Ubuntu will then load the disk partitioner to determine where it's going to be installed. Choose "Manual - use the largest continuous free space". This will automatically select the unpartitioned space we created earlier using the Shrink tool. Click Forward.

On the "Who are you?" screen, enter your username and password details, then click Forward.

On the Migrate Documents and Settings screen, if Ubuntu finds any user accounts to migrate, feel free to import it from Vista to Ubuntu. If it doesn't find any, obviously this isn't an option. Click Forward.

On the "Ready to install" screen, you'll see that Ubuntu now has enough information to commence the installation. In the summary under Migrate Assistant, it should say "Windows Vista/Longhorn (loader)". This means that regardless of whether Ubuntu found any user account to migrate, it certainly knows that Windows Vista is installed on the other partition and is aware of it. Click Install.

See the install through and then let it boot into Ubuntu.

When the install is complete the system will reboot. When the GRUB boot menu is displayed, have a look at the last entry in the list.

After the Ubuntu boot options, there will be an entry "Other operating systems" and beneath that "Windows Vista/Longhorn loader". By default Ubuntu will load itself after 10 seconds, but you can select the Vista option and Vista will boot normally.


STEP 3 - Choose a bootloader

If you want to use the GRUB bootloader then you don't need to do anything further. Ubuntu installs GRUB into the MBR by default and will happily dualboot itself and Vista.

If however you prefer to keep Vista in charge of things, then you'll need to do a little bit of tweaking.

Firstly, boot into Ubuntu and go to Applications --> Accessories --> Terminal. Then, type in sudo gedit /boot/grub/menu.lst.

This text file contains all the information GRUB uses to configure various boot options. Scroll down and the entries between "## ## End Default Options ##" and "### END DEBIAN AUTOMATIC KERNELS LIST" are the LInux boot options. Slightly further down is the option for the Vista/Longhorn bootloader.

We'll need these entries for use later on, so dump them out to a location accessible by the Vista partition. Alternatively, Ubuntu can access the Vista partition directly - go to Places --> Computer, and double-click into the option marked "xx GB Media". This is the NTFS Vista partition. Ubuntu will prompt for authentication (your Ubuntu password) and then you can either copy the entire menu.lst file into it, or create a new text file on the fly, open it with gedit and copy in the boot entries.

Then restart the machine and boot into Vista

Now we need the latest version of EasyBCD by Neosmart Technologies - download it here. Install the application and launch it.

First, go to "Manage Bootloader" and select "Reinstall the Vista Bootloader", then "Write MBR". This puts the Vista bootloader back into the MBR, but the machine will only boot into Vista.

To enable access to the Linux partition, the best option is to install NeoGrub. Go to "Add/Remove Entries", go the NeoGrub tab and select "Install NeoGrub". This adds the "NeoGrub Bootloader" option to the Vista bootloader.

Once that's done, choose Configure - this launches the NeoGrub menu.lst file, location at C:\NST\menu.lst. Use Notepad or Wordpad to open the file, and then paste in the boot entries. Save and exit, then reboot the machine.

The system will come up with two boot options. Select "NeoGrub Bootloader" and then the Linux boot options will load. Choose the relevant option and the system boot into Ubuntu.


That's it! Now you will have option to boot your system into Vista or Ubuntu.

Vista vs Ubuntu

Growing up with windows was good. unfortunately the latest sequel, Vista was a failure. This OS sure looks good but at an expensive cost. The system itself cost RM300. Not to mention the hardware cost i have to bare. Minimum requirement for RAM is 2GB for it to run smoothly. So, i ditch the Vista to venture into new era - Open Source. This time, i choose Ubuntu.

Machine :
HP Pavilion TX2032au (TX2000)

Specification :

Product Name tx2032AU
Product Number KP123PA
Microprocessor 1.90 GHz AMD Athlon 64 X2 Dual-Core TK-57
Microprocessor Cache 512 KB L2 Cache
Memory 2048 MB (2 x 1024 MB)
Memory Max Up to 4 GB (Up to 1 GB may not be available due to 32-bit operating system resource requirements)
Video Graphics NVIDIA GeForce Go 6150
Video Memory Up to 559 MB
Hard Drive 160 GB (5400 rpm)
Multimedia Drive LightScribe SuperMulti 8X DVD±RW with Double Layer Support
Display 12.1”WXGA High-Definition HP BrightView Widescreen Display (1280 x 800) with Integrated Touch-screen (finger and digitizer pen optimized)
Fax/Modem High speed 56K modem
Network Card Integrated 10/100/1000 Gigabit Ethernet LAN
Wireless Connectivity 802.11a/b/g WLAN

Bluetooth
Sound Altec Lansing speakers

3D Sound Blaster Pro compatible sound 16 bit integrated
Keyboard 101 key compatible
Pointing Device Touch Pad with On/Off button and dedicated vertical Scroll Up/Down pad, volume control, mute buttons, 3 Quick Launch Buttons
PC Card Slots
  • One ExpressCard/34 slot
External Ports
  • 5-in-1 integrated Digital Media Reader for Secure Digital cards, MultiMedia cards, Memory Stick, Memory Stick Pro, or xD Picture cards
  • 3 USB 2.0
  • 1 VGA port
  • 1 RJ11 modem connector
  • 1 RJ45 ethernet connector
  • S-video TV out
  • Expansion Port 3
  • 2 headphones-out one w/ SPDIF out
  • 1 mic-in
  • 2 Consumer IR (on panel & on base)
  • integrated stereo mic
  • AC adapter
Dimensions 22.4 cm (L) x 30.6 cm (W) x 3.13 cm (min H) / 3.87 cm (max H)
Weight Under 2kg with 4-cell battery
Security
  • Integrated Fingerprint reader
Power
  • 65 W AC Power Adapter
  • 4-cell and 8-cell Lithium-Ion (Li-Ion) battery
What's In The Box HP Pavilion WebCam with Integrated Microphones

Previous OS : Vista Premium
New OS : Ubuntu 8.04 Hardy Heron

Let's start exploring~